
Being a SE for Nutanix means I daily get to demonstrate the operatively, manageability and value of the Nutanix platform, plus all the features that is has. One of these features is the REST API, but although I demonstrate the REST API Explorer I don’t actually use it (or know how to use it). Due to this I decided I needed to present the value of the Nutanix REST API at a recent London NUG (Nutanix User Group), nothing like a presentation to get you going. Through the course of preparing for the NUG I discovered a wealth of information but most of it assumed I knew how to script for REST. This is my journey through REST.
One thing, note the title has v2 in it. That’s not because this is version 2 of the series (is that just confusing?!) but as I type this Nutanix as on the cusp of realising version 3 of the REST API. This post covers version 1 (actually v0.8) and version 2.
It’s worth all Nutanix features/operations have a REST API built into from the beginning, API’s are not shoe horned in once we’ve released the feature. Anyone familiar with Nutanix will also know we release features first as a command line, then as a Prism UI beta feature and then finally as Prism UI GA.
The first place to start is the explorer. This can be accessed through Prism by clicking on the user icon.

Accessing REST API from Prism
The REST API Explorer opens in a separate page. This then shows the Entities for Nutanix and the Operations you can apply to those Entities. Entity Operations cover:
- GET – is a read only option to check value of an entity
- POST – to add an entity (e.g. to add a Container)
- PUT – to modify value of an entity (e.g. to update name of a Container)
- DELETE – to delete an entity
Start by trying out the Alerts feature by expanding /alerts and then GET /alerts. This expands into:
- Implementation Notes – A note on what the operation does
- Model / Model Schema – A handy list of the queries that can be run (more on this in future posts)
- Response Content – Advises what language the query can be processed in (very important when it comes to scripts)
- Parameters – Fields to do a query against, covering value, description and data type
- Error status codes – In a nutshell “200 = Success”, “400 – Humane side error”, “500 – Server side error”
Try out the Alert by just using the Resolved and/or the Acknowledged drops downs, then click on “Try it out!”

The response should include Alerts that match the parameters plus a Request URL. Take a copy of this URL and place it into the browser, the output isn’t very readable but gives you a good idea of what can be found within that request.
Delving a little deeper lets look at finding VM’s that are powered off. As before expand the VM entities and then expand the GET operation. Possible operations with GET to filter output:
- Count: Provide number of container objects desired
- Page: with Paginated output which page is desired
- filterCriteria : to filter output e.g. filterCriteria=power_state==off : will display
- sortCriteria : Use attribute with which you want to sort the output
- searchString: to search for any value in output
Within the filter fields under filterCriteria enter:
power_state==off
Then click “Try it out!” (make sure you’ve got a VM powered off!)
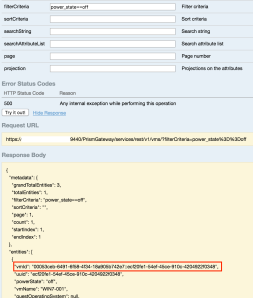
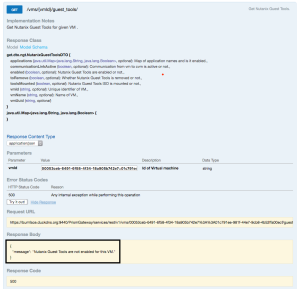
The result will return all the VM’s that are powered off. Within this is we get the VMid, copying this we can then pass it into other operations and filters. For instance:
GET /vms/{vmId}/guest_tools – Giving you a response that Guest Tools aren’t installed on this VM
Next to use the POST and DELETE operations in creating a Container, to do this you’ll need the Storage Pool Uuid (I’ll leave you to work out how to do that). Expand out the POST /containers/ entity and you’ll get a parameters text box that needs some information to create the Container. This will be the name of the Container and the Storage Pool Uuid:
{“name”: “DELETE-ME”, “storagePoolUuid”: “e933ea74-0f13-45ae-8ce1-f86e8cbee5fb”}
Click Try it Out! and accept the notice that you’re going to make changes, as good administrators we always accept the warning. By the time you’ve connected back to the Prism UI the Container would have been created. This gives you an idea of the power of REST API.

As ever we should tidy up after ourselves, so expand DELETE /containers/ and input the Container Uuid to mark it for deletion – once again this will take seconds to occur.

Final piece is using the request URL. In the last example I wanted to find the Container Uuid which could be quite hard from just scrolling through the explorer. In this case we can use the request URL which is the JSON array and search it.
![]()
Resources
The following resources have proved helpful while I was building my presentation.
- Nutanix Community – If you’re thinking about doing it, someone else has already done it
- Available from the my.nutanix website is the Acropolis API Reference guide
- Tutorial included which will guide you through writing a REST API based script
- Updated regularly at each software release
- I found the following blogs helpful:
- NutanixREST API with python byChristian Johannsen (http://datatomix.com/?p=146)
- How to use Python with Nutanix REST API (3 parts) by Andre Leibovici (http://myvirtualcloud.net/how-to-use-python-with-nutanix-rest-api-part-1/)
- Authentication Methods using REST API With Nutanix by Dwayne Lessner (http://itbloodpressure.com/2015/11/11/authentication-methods-using-rest-api-with-nutanix/)


